Best Greenhouse Kit for Beginners: Buy Smarter
You can spot a first-time greenhouse owner fast: they fall in love with the idea of winter tomatoes, order a kit, and then realize the real job is managing heat, wind, and water in a small glassy box. The right greenhouse kit makes that learning curve feel elegant – not chaotic. It gives you a clean build, predictable ventilation, and enough stability that your weekend hobby does not turn into a repair project.
If you are shopping for the best greenhouse kit for beginners, the “best” part depends on what you want most: a refined look on the patio, a practical space to start seedlings, or a season-extending structure that can handle real weather. Let’s make the choice feel simple and premium.
What “best” means for a beginner greenhouse kit
A beginner-friendly kit is less about maximum square footage and more about removing points of failure. You want a frame that stays square during assembly, panels that do not rattle in a breeze, and ventilation you will actually use. A surprising number of new growers lose plants to overheating, not cold. That is why venting, door design, and how easily you can add shading matter as much as the cover material.
You also want a kit that fits your lifestyle. If you picture a greenhouse as part of your outdoor design, you will care about clarity, clean lines, and hardware quality. If you primarily want dependable seedlings for raised beds, you will care about workflow: shelving, hose access, and how quickly the temperature swings when the sun hits.
Start with placement, not product
Before you compare kits, pick the spot. A greenhouse is a light-capture device – and the best kit in the world under heavy shade is still a compromise.
Aim for 6+ hours of direct sun, with morning sun if you have a choice. Morning light dries condensation earlier, which helps reduce mildew pressure. Wind exposure is the second factor. A breezy corner of the yard can be workable, but it pushes you toward sturdier frames, better anchoring, and thicker panels.
Finally, be honest about your access. If carrying watering cans across the lawn sounds charming now, it will feel less charming in August. A short path to a hose line or outdoor spigot turns greenhouse care into a smooth routine.
The three beginner kit styles and who they suit
The easiest way to narrow “best” is to choose the style that matches how you will use it.
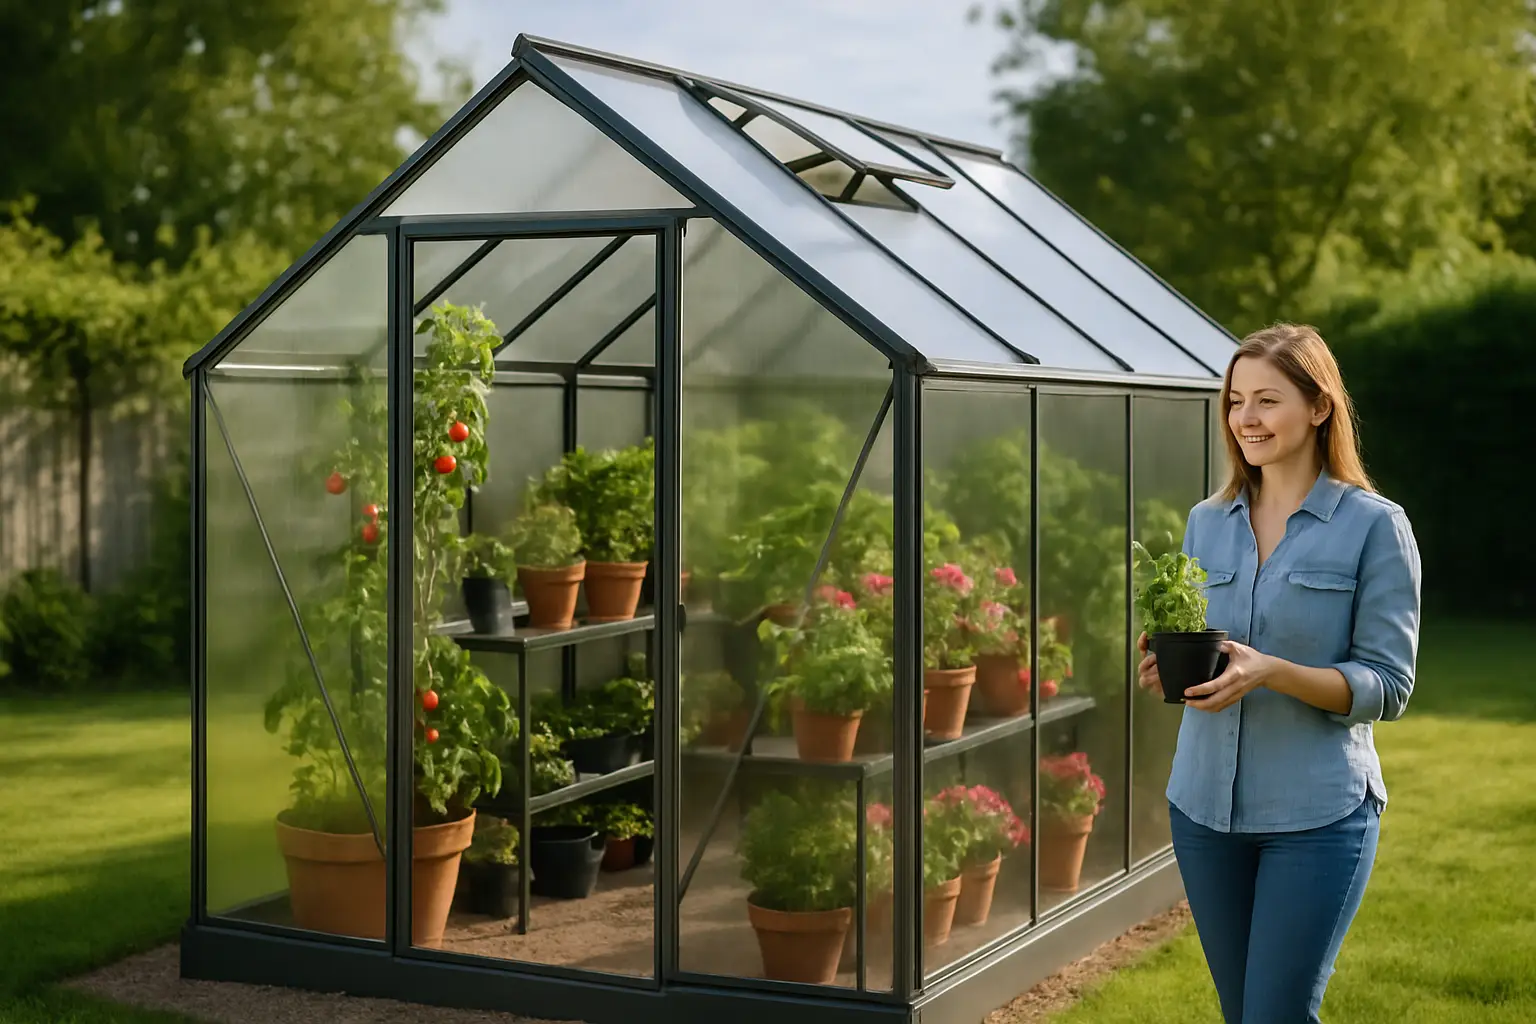
Walk-in greenhouse kits (the classic choice)
If you want a true growing room and not a storage shelf with a cover, walk-in kits are the beginner sweet spot. They give you headroom, airflow, and the ability to organize plants by height. The trade-off is that they demand a more deliberate base and anchoring plan.
For beginners, look for a walk-in kit with a rigid frame (aluminum or galvanized steel), a door that closes cleanly, and roof vents you can open without a ladder. This category is where polycarbonate panels shine because they insulate better than single-layer plastic film and feel more refined.
Lean-to greenhouse kits (beautiful and efficient)
A lean-to attaches to a wall or sits against it. Beginners like them because they can borrow heat from the home, feel protected from wind, and look intentional on a patio. They also tend to be smaller and easier to heat if you choose to add a small heater.
The trade-off is sun exposure. If the wall faces the wrong direction, you can end up with a stylish greenhouse that is light-starved. A lean-to is best when you can place it on a south-facing wall (or as close as your property allows) and you are comfortable checking that roof runoff will not dump water onto the structure.
Mini and portable greenhouse kits (budget-friendly, not always beginner-friendly)
These are the zip-up cover styles with lightweight shelves. They are tempting as a first step, but they can frustrate beginners in windy areas because they move, flap, and swing in temperature quickly. If you choose one, treat it as a seed-starting tool, not a year-round greenhouse.
They work well on a sheltered porch or against a fence, especially when you want to harden off seedlings. Just know that “portable” often means “requires babysitting.”
Materials that matter most
A premium-feeling greenhouse is usually the result of two choices: the frame and the glazing.
Frame: aluminum vs. steel vs. wood
Aluminum frames are common for good reasons. They are clean-looking, resist corrosion, and keep the kit manageable for DIY assembly. For most beginners, aluminum hits the best balance of durability and ease.
Galvanized steel is heavier and often stronger. If you live where storms are a real factor, steel can be reassuring, but it may require more effort to assemble and anchor.
Wood frames can be stunning and warm, but beginner kits in wood vary widely in quality. Wood also asks more of you over time: sealing, checking joints, and monitoring for moisture-related wear. If you want wood for the aesthetic, choose a kit that clearly communicates the wood type and treatment, and commit to the upkeep.
Glazing: polycarbonate vs. glass vs. film
Polycarbonate panels are the most beginner-friendly option for most climates. They insulate better than glass, diffuse light to reduce leaf scorch, and do not shatter. Multiwall polycarbonate in particular helps buffer temperature swings.
Glass is the statement look. It offers clear visibility and a classic greenhouse aesthetic, but it can be less forgiving in hail-prone regions, and it tends to be heavier. If you love the glass look, prioritize tempered glass and a frame that feels engineered, not flimsy.
Plastic film or PVC covers are inexpensive and lightweight. They can be effective for seed-starting, but they are less durable and usually offer the least insulation. They also look more utilitarian than curated.
The features that separate a “nice kit” from the best greenhouse kit for beginners
Ventilation is the real make-or-break. A beginner often thinks they will “just crack the door.” In practice, you want adjustable vents that create a chimney effect: cooler air in low, hot air out high.
Automatic vent openers are a luxury that feels instantly practical. They open as temperatures rise and close as it cools, reducing the chance you cook seedlings while running errands.
Door design matters too. Sliding doors save space and handle wind better than some hinged doors, while hinged doors can seal more tightly when built well. If you will use a wheelbarrow or large pots, check the door width now, not after delivery.
Look for included gutters or the ability to add them. Rainwater collection can be an elegant upgrade, and gutters also help control dripping and splash-back around the foundation.
Size: go smaller than you think, then one step bigger
Most beginners are happiest starting in the 6 ft x 8 ft range for a walk-in kit or a compact lean-to if they are focused on herbs, greens, and starts. You want enough space for airflow around plants and a small work surface.
If you are torn between two sizes, choose the slightly larger option only if you can commit to organizing it. A cramped greenhouse quickly becomes a jungle, which is charming until you cannot reach the back corner to water.
Foundation and anchoring: the quiet determinant of long-term happiness
A greenhouse that shifts in the first big wind is not a beginner problem – it is a planning problem. Many kits can sit on a prepared base, but “prepared” should be taken seriously.
A simple and effective approach is a level frame base (pressure-treated lumber or a manufacturer base) anchored to the ground. In higher-wind zones, consider ground anchors or securing to a concrete perimeter. If your yard is uneven, invest time in leveling. Doors that do not align, panels that pop, and leaks that appear later often start with a base that was “close enough.”
Climate reality check: how you will actually use it
If you live in a mild climate, your greenhouse may function as a comfortable season extender with natural ventilation and occasional shading.
If you have hot summers, plan for shade cloth and strong venting. Your greenhouse can become too hot even when it is 75°F outside if the sun is intense.
If you have cold winters and want year-round growing, the kit is only part of the story. You will care about insulation (multiwall polycarbonate), sealing, and whether you will add a heater. It is doable, but it is a more involved lifestyle choice than many beginners expect.
A curated buying mindset: pay for the parts you touch
When you evaluate kits, focus on what will affect daily use and long-term stability: vent hardware, panel thickness, frame rigidity, and door quality. Decorative extras are nice, but a greenhouse feels “high-end” because it operates smoothly.
If you prefer shopping a curated assortment that prioritizes design-forward, quality-led home upgrades alongside outdoor living essentials, you can browse greenhouse options and related patio gear at mytotaltake.com while keeping an eye out for shipping, returns, and service assurances that make a large-box delivery feel low-stress.
Closing thought
Choose a greenhouse kit the way you choose furniture you plan to live with: not just for the first impression, but for how it behaves every day. When the frame stays steady, the vents respond, and the space feels calm to work in, you will garden more often – and that is what turns a beginner setup into a lasting, beautifully grown habit.


Leave a comment