
Painter’s Tape and Designer Fixes to Hide Living Room Cables Renters Can Use
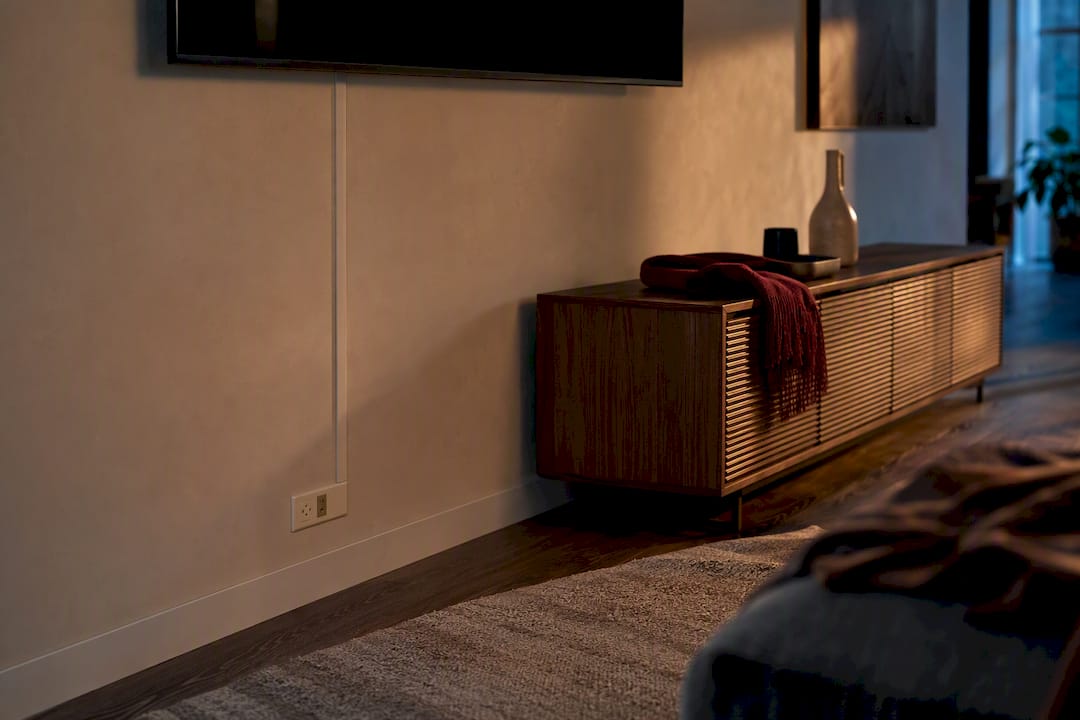
The most effective way to hide living room cables combines three moves: a paintable raceway or furniture routing for the TV drop, a ventilated cable-management box for power strips and adapter bricks, and Velcro sleeves to bundle everything in between. Renters get the same result with a TV stand and grommet routing, or an adhesive raceway applied over a painter’s-tape barrier. One rule overrides every method: never run power cords under a rug.
TL;DR:
- Painting a wall-mounted raceway the same color as your wall makes it almost invisible and reduces the perception of hardware in the room.
- Ventilated cable-management boxes prevent heat buildup around charging devices and should be mounted off the floor to avoid fire hazards.
- For long cable runs along the floor, baseboard or J-channel raceways with mitered corners create a seamless, low-profile look that is more durable and visually discreet.
- Renters should use painter’s tape with adhesive raceways to prevent wall damage and choose furniture with built-in grommets to route cables without drilling.
- Disguising cables with matching fabric sleeves, decorative boxes, or painting raceways to blend with trim enhances room aesthetics while maintaining safety.
Table of Contents
- How to Hide TV Wires: Raceways, Low-Voltage Kits, and Furniture Routing
- What’s the Best Way to Manage Power Strips and Adapter Bricks?
- How Do You Route Cables Behind Furniture and Inside Cabinets?
- Baseboard and J-Channel Routing for Long Cable Runs
- No-Drill, Renter-Safe Fixes That Won’t Cost You a Deposit
- Decor-Forward Ways to Disguise Cable Runs
- Your Shopping List and 10-Step Install Checklist
- Why Mytotaltake Recommends These Methods
- Balancing Style and Safety in Cable Management
- Curated Picks for a Cable-Free Living Room
- Sources
- FAQ
How to Hide TV Wires: Raceways, Low-Voltage Kits, and Furniture Routing
The vertical run from your TV to the outlet is the single most visible cable problem in any living room, and it has three realistic solutions depending on your walls, your lease, and your patience for tools.
A paintable surface-mount raceway is the fastest fix and the one most homeowners reach for first. It sticks or screws directly onto the wall, holds the cable bundle, and gets painted to disappear into the surrounding surface. Express Mounting recommends sizing the channel about twice the width of your cable bundle, which leaves room for a streaming stick or an extra HDMI line down the road without forcing a second installation. This method works especially well on brick, plaster, or any wall where you’d rather not cut drywall.
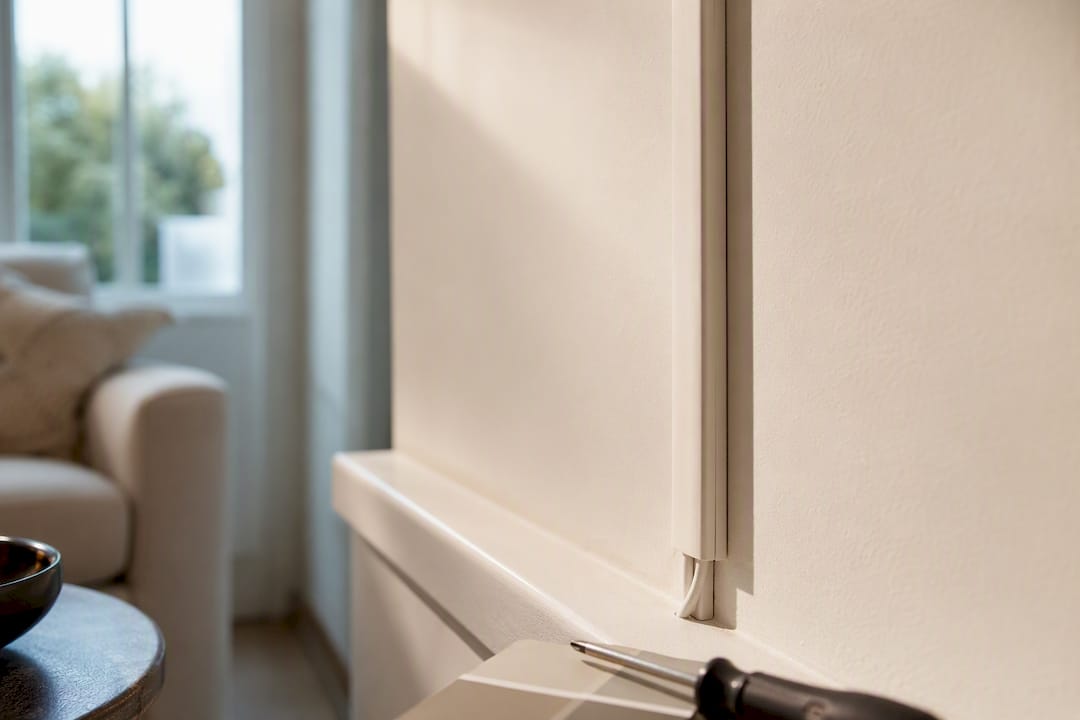
In-wall low-voltage kits route cables through the wall cavity itself, using a pair of recessed plates, one behind the TV and one near the outlet. This is the cleanest possible finish, but it comes with a code boundary worth knowing: low-voltage lines (HDMI, speaker wire) and standard 120-volt power runs need to stay in separate channels rather than bundled together, which is why divided raceways exist for mixed runs. If you’re not confident cutting into a wall cavity, this is the one job worth handing to an electrician.
Furniture routing skips the wall entirely. Place your media console close to the TV, drop the cables straight down behind it, and feed them through a grommet hole in the back panel. No drilling, no paint matching, no landlord conversation.
Whichever method you choose, installation quality comes down to a few habits:
- Measure the exact drop length before buying anything. Guessing leads to a raceway that’s two inches short.
- Choose a raceway width roughly double your cable bundle’s diameter.
- Clean the wall surface so adhesive backing actually holds.
- Cut corner joints at a 45 degree miter rather than a straight butt joint.
Pro Tip: Paint the raceway the exact color of your wall, not just a close match, and it stops reading as hardware entirely. Express Mounting notes that a properly painted channel reads as architectural trim instead of something bolted on after the fact.
What’s the Best Way to Manage Power Strips and Adapter Bricks?
The tangle of adapter bricks behind your entertainment center is usually uglier than the TV cable itself, and it’s the piece most guides skip. Fixing it starts with measuring, not shopping.
Lay out your power strip and every adapter brick side by side, then measure the total footprint before choosing a management box. A box that’s too shallow won’t close, and one that’s too small will trap heat around chargers and routers that run warm all day. Family Handyman lists under-desk organizers and vented boxes as reliable, low-cost options that keep bundles contained without becoming a fire hazard.
A few placement rules make a real difference:
- Mount the power strip under a console shelf or attach it to the furniture frame with an adhesive bracket, off the floor entirely.
- Pick a ventilated box, not a sealed one, for anything charging a laptop, router, or gaming console that draws real current.
- Route the final few inches from the box to the outlet with adhesive clips rather than letting cable pool on the carpet.
- Never route a power cord under a rug or carpet edge. The Consumer Product Safety Commission has flagged cord-related injuries as a recurring hazard, and trapped heat under a rug is exactly the wiring behind restricted airflow that safety guidance warns against.
Once the power strip is contained, the visible mess in most living rooms drops by more than half, simply because the brick pile was the actual eyesore, not the TV cord itself.
How Do You Route Cables Behind Furniture and Inside Cabinets?
Your media console, credenza, or bookshelf is doing more work than you realize if you set it up right. Most furniture with a solid back panel already has, or can be retrofitted with, a grommet hole that turns the cabinet into a built-in cable channel.
- Check for an existing grommet or knockout panel on the back of your console before drilling anything new.
- If there isn’t one, a retrofit grommet kit from any hardware store creates a clean, finished hole in about ten minutes.
- Secure cable bundles to the inside of the furniture frame with adhesive clips or Velcro ties so nothing droops into view when you open a cabinet door.
- Store the power strip inside the cabinet on a mounted bracket, or set it on a small shelf with airflow on at least two sides.
- Pull the console one or two inches away from the wall. That small gap swallows excess cable slack and box bulk that would otherwise crush against the baseboard.
This approach works best when the furniture was chosen with cable management in mind in the first place, which is one reason a well-designed console earns its price over a generic stand with a solid, sealed back.
Baseboard and J-Channel Routing for Long Cable Runs
Ethernet lines, speaker wire, and any cable traveling more than a few feet across a room belong at the floor level, not draped across open space. This is where baseboard and J-channel raceways take over from the vertical TV raceway.
J-channel raceway is a slim, U-shaped track that clips onto the top edge of your existing baseboard, hiding the cable in the shadow line where trim meets wall. Baseboard-style raceway replaces or sits flush against the baseboard entirely, built specifically for longer, flatter runs. Both do the same job: keep cable at ankle height, out of the visual field, and away from foot traffic.
Placement matters more than most people expect. Running the channel along the very top edge of the baseboard, right where wall meets trim, hides it far better than running it along the floor, where shadows and dust make it obvious. Painting the channel to match your baseboard color, rather than your wall color, is the detail that sells the whole illusion.
Corners are where amateur installs fall apart. A straight butt joint at a corner leaves a visible gap and a lifted edge that catches light. Cutting each piece at a 45 degree miter, the same approach Express Mounting recommends for vertical raceways, produces a flush seam instead. Flexible corner couplers are a decent shortcut if you don’t own a miter saw, though they’re never quite as clean as a properly cut joint.
- Use J-channel for cable runs shorter than about six feet or where you want the raceway nearly invisible.
- Use baseboard-style raceway for permanent, long runs like whole-room ethernet or a surround-sound system.
- Miter every corner rather than butting pieces together.
Pro Tip: Buy slightly more raceway than you measure. A single continuous run without a mid-wall splice looks dramatically more finished than two shorter pieces joined together.
No-Drill, Renter-Safe Fixes That Won’t Cost You a Deposit
Renters face a specific problem: every solution above assumes you’re allowed to alter the wall. Here’s what actually works when you’re not.
Adhesive raceways can still go up safely if you apply a strip of painter’s tape to the wall first, then stick the raceway’s adhesive backing to the tape instead of the paint. Clutterless Nest confirms this barrier trick lets you pull the whole thing down at move-out without stripping paint or leaving a residue outline.
- Choose clips rated for your actual cable weight; a clip built for a single thin wire will fail under a bundled ethernet and power combo.
- Wipe the wall with isopropyl alcohol before applying any adhesive so it actually bonds instead of sliding within a week.
- Consider furniture-first routing before you touch the wall at all. A TV stand with a grommet hole solves the entire drop with zero hardware installed.
- The most common renter mistake is skipping the tape barrier because “it’s just a small clip.” Small clips still pull paint, especially on fresh coats less than a year old.
Decor-Forward Ways to Disguise Cable Runs
Cable management doesn’t have to look like cable management. A fabric cable sleeve zipped around a bundle, in a color that matches your rug or your console, reads as an intentional design choice rather than an apology for wiring. Family Handyman points to sleeves and color-matched clips as the simplest way to make a bundle look tidy rather than merely hidden.
- A woven or leather-wrapped cable box on an end table doubles as a small decor object.
- Match raceway or sleeve color to trim, not wall paint, if your walls are a bold or textured finish.
- Rugs can visually anchor a seating area and hide floor clutter near a console, but never route a powered cord underneath one. Route around the rug’s edge instead, using a low-profile floor cord cover if the cable must cross a walkway.
Your Shopping List and 10-Step Install Checklist
Before buying anything, gather these: paintable raceway, a ventilated cable-management box, Velcro cable ties, adhesive wall clips, a grommet kit, a fine-tooth saw or miter box, isopropyl alcohol, and a tape measure.
Sizing rules to follow while shopping:
| Item | Sizing rule |
|---|---|
| Raceway width | About 2x the diameter of your cable bundle |
| Cable-management box | Interior length ≥ power strip length plus adapter clearance |
| J-channel | Slim profile, sized for 1 to 3 cables along baseboard top edge |
- Measure the TV-to-outlet drop and any floor-level runs.
- List every device and cable so nothing gets left out mid-install.
- Buy raceway sized to twice your bundle width.
- Buy a ventilated management box sized to your power strip plus adapters.
- Clean wall and baseboard surfaces with isopropyl alcohol.
- Apply painter’s tape first if you’re renting.
- Install the vertical raceway or furniture grommet.
- Run the baseboard or J-channel section, mitering every corner.
- Bundle loose cable with Velcro ties, leaving slight slack, not tight loops.
- Test every device before closing up boxes or panels, so a bad connection doesn’t mean redoing the whole run.
Why Mytotaltake Recommends These Methods
We focus on sourcing home tech and decor designed to look intentional, not improvised, and cable management is no exception. The same logic that guides our home theater setup recommendations, choose the piece that solves a functional problem without looking like a solution, applies directly here. A well-routed soundbar connection or a console with a proper grommet does more for a room’s finish than most people expect. We favor products and methods that hold up over years, not ones you’ll be replacing or redoing next season.
Balancing Style and Safety in Cable Management
Most cable advice treats safety and style as competing goals, one for people who care about looks and one for people who read fire safety warnings. That split doesn’t hold up. A mitered raceway corner isn’t just prettier than a butt joint, it’s also less likely to snag, loosen, or expose a cable edge over time. A ventilated box isn’t just tidier than a shoebox stuffed with power strips, it’s the version that doesn’t trap heat around a charging laptop.
The real decision point isn’t style versus safety. It’s permanent versus renter-friendly, and that choice should follow your lease, not your ambition. Rent for another year? Start with furniture routing and adhesive clips. Own the place? A properly mitered baseboard system will outlast three TVs. If you want a second opinion on furniture that solves this problem structurally, our team is always happy to point you toward pieces built with routing in mind.
— Lysander
Curated Picks for a Cable-Free Living Room
Sourcing a raceway from one store, a cable box from another, and a console with decent rear clearance from a third is doable, but it’s also the slow way to a finished room. We curate these items in one place, so you’re choosing from pieces vetted for craftsmanship rather than piecing together a solution from various sources.

Browse our Furniture collection for media consoles with generous rear clearance and built-in routing options, check Gadgets for cable-management boxes, sleeves, and clips designed to look as good as they function, and visit Home & Garden for decorative boxes and accent pieces that make a cable run disappear into the room’s design. If you’d rather talk through your specific setup, a customer service team can help you match the right pieces to your space before you buy a single item.
Sources
- Hide TV Wires Without Cutting Walls | Express Mounting
- Hide TV Wires Without Drilling? Here’s the Fix | Clutterless Nest
- Cable management tools and best practices | Family Handyman
FAQ
What Is the Best Way to Hide Cable Cords?
A paintable raceway or furniture-based grommet routing for the TV drop, paired with a ventilated cable-management box for power strips, handles most living rooms without any drywall cutting.
How Can I Hide My Couch Power Cords?
Run the cord along the baseboard using a low-profile J-channel raceway, or tuck it behind the couch and secure it to the frame with an adhesive clip so it never touches the walking path.
What Are Some Decorative Ideas for Hiding Cable Wires?
Fabric cable sleeves in a color that matches your decor, a woven or leather cable box on display, and a raceway painted to match your trim all turn cable management into a styling choice rather than an eyesore.
How Do I Hide Unsightly Electrical Wires Without Damaging Walls?
Use an adhesive raceway applied over a strip of painter’s tape, which lets you remove it cleanly at move-out, or skip the wall entirely with a media console that routes cables through a rear grommet.
Is It Safe to Run Cables Under a Rug?
No. Running power cords under a rug traps heat and creates a recognized fire and tripping hazard, so route cables around rug edges or use a floor cord cover instead.











Leave a comment