Step by Step Home Entryway Makeover on a Budget
A step by step home entryway makeover transforms your front entrance from a forgotten pass-through into the most intentional room in your house. Interior designers call this space the “foyer,” and it functions as the first impression your home makes on every guest and the last thing you see before you leave. The good news: a complete home entrance renovation does not require a contractor or a large budget. With the right sequence, practical materials like beadboard panels and ergonomic mirrors, and a clear plan, budget-conscious DIYers can achieve a result that looks anything but affordable.
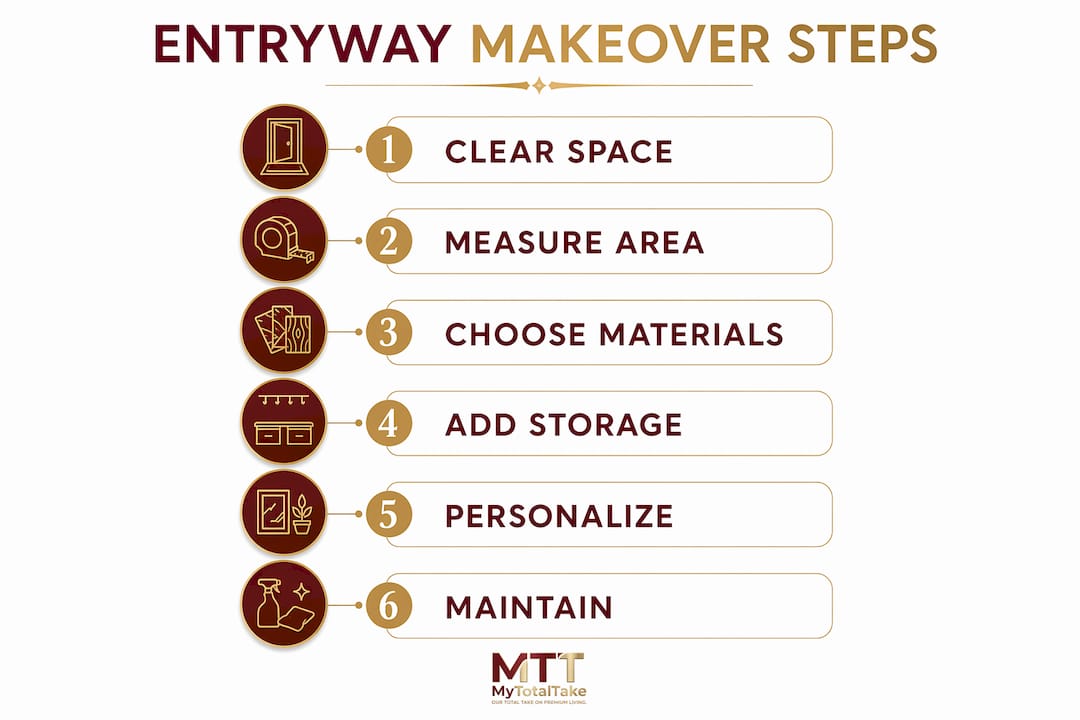
How to clear and prepare your entryway space for a successful makeover
Clearing 100% of clutter is the non-negotiable first step before you buy a single item or pick a paint color. Most homeowners skip this and end up designing around junk. Remove everything: shoes, bags, mail, coats, and any furniture currently in the space. Place it all in another room so you can see the raw square footage you are actually working with.
Once the space is empty, assess what you genuinely use daily versus what has simply accumulated. Active rotation items are things you reach for every single day, like keys, a dog leash, or a work bag. Everything else belongs in a closet or another storage zone. This distinction drives every storage decision you make next.

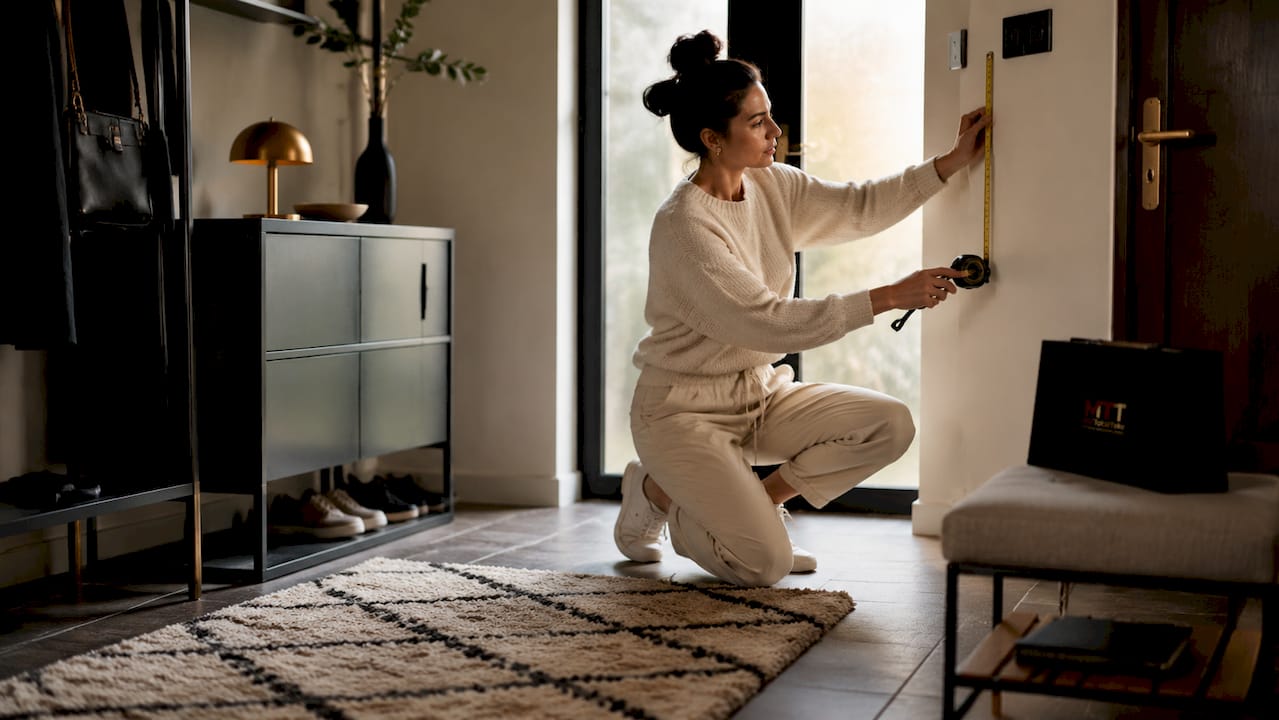
Measure the space carefully before purchasing anything. The single most overlooked measurement is the door swing radius. A rug or bench placed inside that arc will block the door from opening fully, creating a frustrating bottleneck you will live with every day. Mark the arc on the floor with painter’s tape so it stays visible throughout the project.
Pro Tip: Remove every single item from the entryway and stand in the empty space for five minutes. You will immediately see where natural light falls, where traffic flows, and where a bench or console table would actually fit without crowding the path.
Here is a starter checklist of tools and materials to gather before you begin:
- Tape measure and painter’s tape
- Stud finder
- Level
- Sandpaper (120-grit and 220-grit)
- Primer and paint
- Screwdriver and drill
- Patching compound for any wall holes
| Task | Why it matters |
|---|---|
| Remove all items | Reveals true space and dimensions |
| Measure door swing | Prevents furniture blocking door movement |
| Identify daily-use items | Determines storage type and quantity needed |
| Check wall condition | Flags patching or priming needs before painting |
Which design elements maximize style and function in entryway upgrades?
Material choices define both the look and the budget of your entryway design. Eucatile beadboard panels cost around $30 each, and a set of 15 hooks runs about $12 at major home improvement retailers. That means you can install a full accent wall with built-in hook storage for under $100 in materials. The result reads as custom millwork to anyone who walks through the door.
Mirrors are the most functional decorative element in a small entryway. Mirror height placement is critical: too high and shorter family members cannot use it; too low and taller guests feel awkward. The center of the mirror should sit at approximately eye level for the average adult, which is roughly 57–60 inches from the floor. For guidance on getting mirror placement right in any residential space, the principles behind choosing a vanity mirror apply directly to entryway installations.
Lighting upgrades from harsh overhead fixtures to layered soft sources create warmth and make small entryways feel larger. Swap a single ceiling fixture for a combination of a warmer-toned overhead bulb plus a plug-in sconce or a small table lamp on a console. The layered effect adds depth without any electrical work.
Smart storage solutions to consider based on your traffic flow:
- Wall-mounted hooks at 60–66 inches for coats and bags
- A narrow bench with under-seat cubbies for shoes
- A small console table with a drawer for mail and keys
- Floating shelves above the hook rail for baskets or decor
Pro Tip: Always use a stud finder before mounting heavy shelves or mirrors. Drywall anchors alone will not hold a loaded shelf long-term, and a pulled anchor leaves a repair job that costs more time than finding the stud in the first place.
What are the exact steps to execute your DIY entryway makeover?
A structured sequence prevents wasted effort and costly mistakes. Entryway refresh projects can be completed in as little as one day for surface updates, or take several weeks for renovations involving new flooring and paint. Knowing your scope upfront keeps the timeline realistic.
Follow these steps in order:
- Patch and sand walls. Fill any holes with patching compound. Sand smooth once dry. A clean wall surface is the foundation for everything that follows.
- Prime and paint. Apply one coat of primer, let it dry fully (minimum 2 hours), then apply two coats of your chosen wall color with 4-hour drying time between coats. Rushing paint is the most common DIY mistake.
- Install beadboard or accent wall treatment. Cut panels to size, apply construction adhesive, and nail into studs. Use a level on every panel.
- Mount hooks and shelving. Locate studs with your stud finder. Mark positions with painter’s tape before drilling. Check level twice before driving screws.
- Place furniture. Set your bench or console table outside the door swing arc. Confirm the door opens and closes without resistance before finalizing placement.
- Lay the rug. Durable, washable rugs with patterns handle daily traffic and hide marks far better than solid-color options. Low-pile materials are easiest to clean and least likely to curl at the edges.
- Add lighting. Install your new fixture or plug in your sconce. Test the warmth of the bulb against the wall color before committing.
- Style the surface. Place a small tray for keys, a potted plant, and one piece of art or a framed print. Three items on a surface read as curated; six items read as clutter.
“Effective entryways facilitate household movement and avoid becoming stylish obstacle courses, balancing aesthetics with traffic flow.” — The Decor Avenue
Troubleshoot these common errors before you consider the project done. Check that no furniture leg sits inside the door swing arc. Verify that the rug does not bunch under the door. Confirm that hooks are reachable for every member of your household, including children if applicable.
Pro Tip: Gel staining vinyl windows or refinishing existing door hardware ties the whole entryway together at minimal cost. A fresh coat of paint on the front door interior and updated hardware creates a cohesive look without replacing anything structural.
How to personalize and maintain your entryway for lasting impact
Personalization is where a functional entryway becomes a memorable one. Entryways serve as tone-setters for the entire home, making them an ideal low-risk zone for trying bold colors or architectural details you might hesitate to use in a larger room. A deep navy on the accent wall or a graphic wallpaper panel costs little to change if you decide it is not right. That makes the entryway the best design experiment in the house.
Art, greenery, and scent complete the sensory experience. A single framed print at eye level, a trailing pothos on a shelf, and a reed diffuser with a clean scent create an arrival experience that feels considered. Keep the plant low-maintenance. A dead plant in the entryway signals neglect more loudly than no plant at all.
Seasonal updates keep the space from going stale. Swap a wreath, change a throw in a basket, or rotate a small piece of art every few months. These micro-updates take under 15 minutes and cost nothing if you already own the pieces. For a deeper look at building a home decor styling workflow that applies across every room, the same principles of rotation and intentional curation apply here.
Ongoing maintenance habits that prevent clutter from returning:
- Assign a specific hook or cubby to every household member
- Process mail the day it arrives; never let it land in the entryway
- Do a 5-minute reset every Sunday evening before the week begins
- Store seasonal items (umbrellas, extra bags) in a nearby closet, not the entryway
- Reassess storage needs every 6 months as routines change
Common personalization mistakes to avoid: overcrowding a console table with too many objects, choosing a rug that is too small for the space, and hanging art too high on the wall. Art hung at 57–60 inches to the center looks intentional. Art hung at 72 inches looks like an afterthought.
Key Takeaways
A successful entryway makeover requires clearing the space completely first, then building function and style in a deliberate sequence from walls to decor.
| Point | Details |
|---|---|
| Clear before you design | Remove everything to see true dimensions and traffic flow before buying anything. |
| Measure the door swing | Mark the arc with painter’s tape to prevent furniture blocking the door. |
| Budget materials deliver high-end results | Beadboard panels at $30 each and hook sets at $12 can produce a custom-millwork look under $100. |
| Mirror and art height matter | Center both at 57–60 inches from the floor for ergonomic, polished placement. |
| Maintain with a weekly reset | A 5-minute Sunday tidy prevents the clutter that undoes a well-designed entryway. |
The entryway is the room most homeowners get wrong
Every entryway project I have worked on taught me the same lesson: people treat this space as a holding zone rather than a room. They buy a beautiful console table, hang a mirror, and then pile shoes on the floor and mail on the table within a week. The design was never the problem. The system was.
The most durable entryway makeovers I have seen share one trait: every object has an assigned place. The hooks are not decorative. The bench is not just for sitting. The tray is not an accent piece. Each item solves a specific daily problem. When function is that deliberate, the space stays beautiful without effort.
My honest advice: spend 80% of your planning time on storage and flow, and only 20% on aesthetics. The aesthetics will follow naturally once the function is right. A well-placed hook rail with a clean paint color outperforms an expensive console table surrounded by chaos every single time. Treat the entryway as an upscale home styling opportunity, not a leftover corner, and the results will surprise you.
— Lysander
Upgrade your entryway with pieces built to last

A well-executed entryway makeover deserves furniture and decor that hold their quality over time. At Mytotaltake, we curate pieces that earn their place in high-traffic spaces: console tables with durable finishes, mirrors with solid frames, and storage benches built for daily use. Our collection of luxury furniture is selected for craftsmanship and lasting elegance, not just visual appeal. If you want decor that still looks intentional five years from now, explore our high-end home decor collection for pieces that combine refined design with real-world durability. Free returns and fast delivery make it easy to get the right piece the first time.
FAQ
How long does a home entryway makeover take?
Surface updates like paint, hooks, and new decor can be completed in a single day. Renovations involving new flooring or structural changes take several weeks.
What is the most important first step in an entryway renovation?
Clearing 100% of clutter before purchasing anything is the most critical first step. It reveals the true dimensions and storage needs of the space.
How much does a DIY entryway makeover cost?
A budget-focused makeover using beadboard panels at around $30 each and hook sets at around $12 can achieve a high-end look for under $100 in materials.
Where should a mirror hang in an entryway?
The center of the mirror should sit at 57–60 inches from the floor. Placing it too high or too low creates an awkward experience for anyone checking their appearance before leaving.
How do I keep my entryway organized after the makeover?
Assign a specific hook or cubby to every household member and do a 5-minute reset each week. Processing mail daily and storing seasonal items in a nearby closet prevents clutter from returning.


Leave a comment